I was superimpressed by this cool Javascript demo uploaded to the internet this past week by Philippe Deschaseaux.
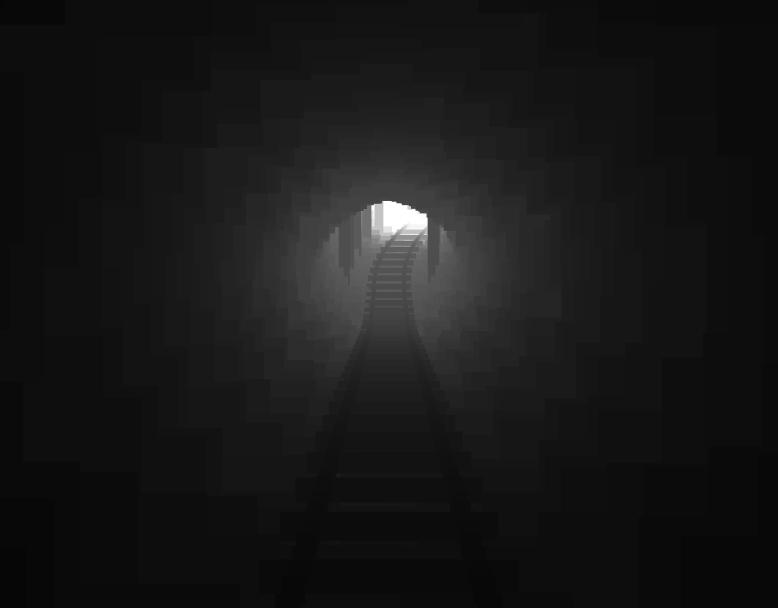
It is all done in less than one kilobyte of Javascript code, without WebGL or libraries, and the result is very beautiful and intriguing, so I decided to analyze the code as I usually do to see If I can learn something from the author and It turned out the whole demo is full of great ideas. Lets check the code.
The Code
My first surprise was when I opened the code, besides the creation of the canvas, the rest look all cryptic. Seems mostly giberish, really hard to understand anything due to some kind of ofuscation done to hide and reduce the code. So I need to deofuscate it if I want to read it.
The first thing I noticed is that most of the code is stored in a string var called underscore, and at the end he does some transformations to that string and pass the result to the eval function to execute it. This way the code can be ofuscated in extreme ways, replacing chuncks of character with special UTF8 characters that will be expanded later.
To read the real code executed all I had to do was to replace the eval by something like console.log, and check the output. I passed the output through some beautifier and the result is:
b.bgColor = X = Y = H = I = J = E = Q = U = V = 0;
T = [l = 1];
C = (c.width = c.height = innerHeight) / 2;
setInterval(function () {
    for (i = H; i < X + 1400; H = ++i) {         (s = i % 800) || (D = i / 800, P = D & 1 && -Q + (Q = Math.random() > .5), K = !P && D && (K + 2 + (Math.random() > .5)) % 3 - 1, B = !P && D > 9 && !B && Math.random() > .7, W = 1.8 * Math.random() - 1);
        E += F = (s < 160) - (s > 639);
        p = T[i % 1400] = [I += J, J += K, U += V, V = P * E, !P && Math.exp(-(L = i % 400 - 200) * L / 3e3) / 1.5, i % 400, Math.random() > .95];
        if (i % 10 == 0) {
            for (y = Z = 9.8 + B * E / 15, z = W * B * E / 15, g = Math.random() / 6; g < 6.3; g += 2 / Z) Math.random() > (P || B ? .4 : Math.cos(g) > .5) && p.push(1.1 * Z * Math.cos(g + 11), 7 + B * 16, 4 - F, Z * Math.cos(g) + 2 + z, 4 - F);
            for (t = 2 * Z * Math.random() - Z, w = t * t * Math.random() / 6; B * w > .2;) p.push(t, 7 + B * 16, w, --y + z, 1.1, t, 7 + B * 16, w *= .8, -y + z, 1.1);
            Q || B * W > .6 && p.push(2 * Z * Math.random() - Z, 12, .2, Z * Math.random() - Z / 2 + z, 1 + Math.random());
            !B || i % 20 || p.push(-2, 22, .5, -7, Z - 8 - z, 2, 22, .5, -7, Z - 8 - z);
            i % 20 || p.push(0, 6, 6, -6.8, .8);
            L || p.push(0, 7 + B * 16, .2, Z + z, Z + z - 5, 0, 7, .6, 5, .6);
            P || B || (i % 40 || p.push(-6, 6, 1.5, 5, 14, 6, 6, 1.5, 5, 14), i % 20 || p.push(0, 6, 17, 8, 3))
        }
        i % 5 || p.push(-2, 6, .5, -6.5, .6, 2, 6, .5, -6.5, .6)
    }
    for (q = T[X % 1400]; d = --i - X;) for (p = T[i % 1400], f = C / (d / 10 + 3), v = g = 0, t = C + f * (p[g] - q[g++] - d * q[g++]) / 3e3, u = C + f * (p[g] - q[g++] - d * q[g++]) / 3e3, x = p[g++] * (l = p[g++] ? g++ && l : p[g++] ? Math.random() > .3 : 1), y = d / 1800; z = f * p[g++], w = p[g++];) {
            v != w && (v = w, a.fillStyle = 'hsl(0,0%,' + 16 * (w & 7) * (w & 8 || y + x * (w < 16)) + '%)');
            a.fillRect(t + z - (z = f * p[g++]) / 2, u - f * p[g++] + (w == 12 && f * 6 * Math.cos(g + X / 400)), z, f * p[g++])
    }
    Y += 4 - 3 * Math.exp(-X / 400) + q[2] / 3e4;
    X = 0 | Y
}, 35)
Interesing but hard to read. The code probably was optimized by the Closure Compiler so in order to read it you have to expend a lot of time cleaning it. I had to play for an hour to understand most of it, and all I can say is that the approach is very neat, I will try to explained chunk by chunk.
The Rendering
First he puts the bgcolor of the website to black and initializes lots of vars to 0.
b.bgColor = X = Y = H = I = J = E = Q = U = V = 0;
T = [l = 1];
In this line he resizes the Canvas to fit the full screen vertically, but also saves the middle point of the scene
C = (c.width = c.height = innerHeight) / 2;
Then launches a setInterval to call his rendering function every 35 ms.
The rendering function consist in generating 1400 layers of data (stored in T), every layer is a slice in XY of the scene containing what I call a "rectangle's cloud", which is an array of rectangles spread on that XY plane. Every layer has a different Z so when rendered from far to near, it gives a nice depth impression similar to a point cloud rendering.
The layers are not rendered to independent canvas, they are just stored on an array called p with all the rectangles info.
The info stored per rectangle is [x, brightness, width, y, height].
Instead of computing all the layers every frame, it only compute the newest ones (the ones that had become visible). This works because the layers are static (besides the blinking lights which is computed aside when rendering the rectangles):
for (i = H; i < X + 1400; H = ++i)
    {
Now it computes several factors that will be used to define the area in which the minecart is passing by (bridge, tunnel, slope, etc), encoding them in several factors.
Sadly most of the equations had been very ofuscated (probably due to the optimizations of Closure) so I will have to wait till Philippe releases his own explanation of the code.
(s = i % 800) || (D = i / 800, P = D & 1 && -Q + (Q = Math.random() > .1), K = !P && D && (K + 2 + (Math.random() > .5)) % 3 - 1, B = !P && D > 9 && !B && Math.random() > .7, W = 1.8 * Math.random() - 1);
E += F = (s < 160) - (s > 639);
Now it gets the current layer array from T, initialized it with info about the X and Y offset of the layer used to do the curves, slopes and camera movements. It also stores info about a brightness modulation for the layer. This is later used to fake the ilumination by brightening the layers close to the lights.
p = T[i % 1400] = [I += J, J += K, U += V, V = P * E, !P && Math.exp(-(L = i % 400 - 200) * L / 3e3) / 1.5, i % 400, Math.random() > .95];
The algorithm to fill the layers is split in several parts, every part fills some information about the layer (rails, cave, light bulbs, etc), but they are spread in different steps, which gives a better sense of depth without having to fill every single layer. Check the use of "i % something".
Here is a list of some of the vars and their explanation:
- T: all the layers
- i: current layer index
- p: contains the rectangles of the current layer
- I: X of rails generation (fixing it will make the rail straight all the way
- J: rotation speed of rails, fixing it will make the rail and the camera go straight
- E: window to modulate the transition between areas
- Q: boolean used to activate areas
- U: never changes
- V: delta Y of the rails
First the cave rendering:
//every 10 layers build a cave layer
if (i % 10 == 0)
{
    //cave walls
    for (y = Z = 9.8 + B * E / 15, z = W * B * E / 15, g = Math.random() / 6; g < 6.3; g += 2 / Z)
    Math.random() > (P || B ? .4 : Math.cos(g) > .5) && p.push(1.1 * Z * Math.cos(g + 11), 7 + B * 16, 4 - F, Z * Math.cos(g) + 2 + z, 4 - F);
    //stalactitas
    for (t = 2 * Z * Math.random() - Z, w = t * t * Math.random() / 6; B * w > .2;)
        p.push(t, 7 + B * 16, w, --y + z, 1.1, t, 7 + B * 16, w *= .8, -y + z, 1.1);
    //the misterious glowing crystals
    Q || B * W > .6 && p.push(2 * Z * Math.random() - Z, 12, .2, Z * Math.random() - Z / 2 + z, 1 + Math.random());
    //vertical woods in big caves
    !B || i % 20 || p.push(-2, 22, .5, -7, Z - 8 - z, 2, 22, .5, -7, Z - 8 - z);
    //rail woods
    i % 20 || p.push(0, 6, 6, -6.8, .8);
    //lights
    L || p.push(0, 7 + B * 16, .2, Z + z, Z + z - 5, 0, 7, .6, 5, .6);
    //colums and ceiling
    P || B || (i % 40 || p.push(-6, 6, 1.5, 5, 14, 6, 6, 1.5, 5, 14), i % 20 || p.push(0, 6, 17, 8, 3))
}
And then the rails (they are separated because to give a better feeling of continuity the rails are rendered every 5 layers instead of 10 as the cave.
i % 5 || p.push(-2, 6, .5, -6.5, .6, 2, 6, .5, -6.5, .6)
Once we have all the layers needed, we do the rendering pass. This part has lots of mathmatics to do the perspective projection, the camera movements, etc.
It renders the layers in front of the camera as a set of rectangles until certain distance, from far to near.
    for (q = T[X % 1400]; d = --i - X;)
	for (p = T[i % 1400], f = C / (d / 10 + 3), v = g = 0, t = C + f * (p[g] - q[g++] - d * q[g++]) / 3e3, u = C + f * (p[g] - q[g++] - d * q[g++]) / 3e3, x = p[g++] * (l = p[g++] ? g++ && l : p[g++] ? Math.random() > .3 : 1), y = d / 1800; z = f * p[g++], w = p[g++];)
	{
	    v != w && (v = w, a.fillStyle = 'hsl(0,0%,' + 16 * (w & 7) * (w & 8 || y + x * (w < 16)) + '%)');
  	   //draw rectangle as point
	   a.fillRect(t + z - (z = f * p[g++]) / 2, u - f * p[g++] + (w == 12 && f * 6 * Math.cos(g + X / 400)), z,f * p[g++])
	}
And finally the delta time, that increases the speed using different intervals to give the sensation of climbing or descending.
 //controls the speed
 Y += 4 - 3 * Math.exp(-X / 400) + q[2] / 3e4;
 X = 0 | Y
I made a little graph with some of the variables of the loop to visualize the evolution over time:
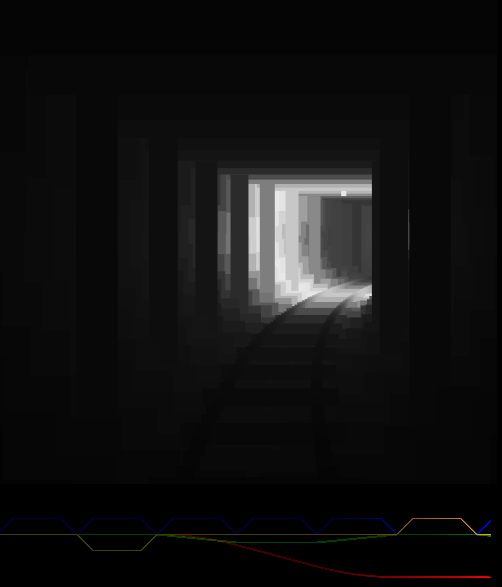
It is interesting to see how simple formulas can add to create smooth transitions.
Conclusion
There are still lots of tricks I have to investigate but overall all I can say is that I wish one day I can do something so neat as this. Congratulations to Philippe, you inspired me to work harder.
Edit:
Philippe has posted two entries in his blog talking about how he did it:
Leave a Reply